Discover the vibrant world of tie-dye with Tulip’s user-friendly kits and comprehensive guides. Perfect for beginners, these instructions offer step-by-step techniques for stunning, customizable designs. Create colorful patterns with ease!
Overview of the Tulip Tie-Dye Kit
The Tulip Tie-Dye Kit is a comprehensive, beginner-friendly set designed to simplify the tie-dye process. It includes pre-loaded dye bottles, rubber bands, gloves, and detailed instructions. Perfect for all skill levels, the kit offers vibrant, washable colors and easy-to-follow steps. The one-step dye formula eliminates the need for additional chemicals, making it safe and convenient. With reusable supplies, you can create unique, customizable designs on fabrics like cotton, linen, and rayon. The kit’s accessibility and versatility make it ideal for crafting projects, ensuring consistent results when instructions are followed. It’s a great way to achieve professional-looking tie-dye effects at home.
Importance of Following Instructions
Following the Tulip Tie-Dye Kit instructions ensures vibrant, long-lasting colors and professional results; Deviating from guidelines can lead to uneven dye distribution or faded colors. Proper preparation, like washing fabric before dyeing, is crucial for optimal absorption. Mixing dye accurately and allowing the recommended setting time prevents color bleeding. Incorrect techniques may result in designs not holding their shape. Adhering to instructions guarantees safety, as improper handling of dyes can cause skin irritation. The kit’s success lies in precise steps, making it essential to follow each detail for the best outcome. This attention to detail ensures your tie-dye project turns out as envisioned, every time.
Materials Needed for Tulip Tie-Dye
Gather essential materials: Tulip Tie-Dye Kit, pre-washed fabric, rubber bands, plastic wrap, gloves, and protective gear. Ensure all items are ready for a smooth process.
Fabric Preparation
Start by washing and drying your fabric to remove sizing and finish. This ensures optimal dye absorption. Use natural fibers like cotton or rayon for vibrant results. Dampen fabric before tying to enhance color penetration. Avoid using fabric softeners or bleach, as they can hinder dye effectiveness. Proper preparation guarantees professional-looking tie-dye designs. Follow kit instructions for specific fabric recommendations. Ensuring fabric is clean and ready is crucial for achieving desired colors and patterns in your project.
Dye and Chemicals
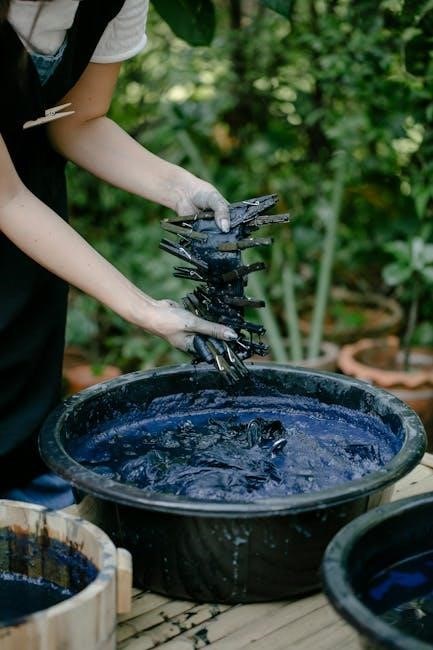
The Tulip Tie-Dye Kit includes pre-measured dye packets and necessary chemicals for vibrant results. Mix dye powder with water in the provided squeeze bottles, ensuring thorough dissolution. Use gloves to handle dye to prevent skin staining. Follow the mixing ratio precisely to achieve desired intensity. For darker colors, use more dye; for pastels, use less. The kit’s one-step formula eliminates the need for additional fixatives, simplifying the process. Proper mixing ensures consistent color application and long-lasting vibrancy. Always mix in a well-ventilated area and avoid inhaling dye powders. Following these steps guarantees professional-quality tie-dye outcomes every time.
Tools and Accessories
The Tulip Tie-Dye Kit includes essential tools for a successful project. Squeeze bottles with pre-measured dye powder simplify mixing, while rubber bands and zip ties help create unique patterns. Gloves protect hands from stains, and plastic wrap is provided for layering fabric to prevent dye seepage. A washing bag is included to protect your design during the first wash. Additional accessories like buckets or trays for dyeing and protective gear for work surfaces are recommended. These tools ensure a mess-free and efficient tie-dye experience, making the process enjoyable for both beginners and experienced crafters. Proper use of these accessories guarantees vibrant, long-lasting results.
Preparation Steps
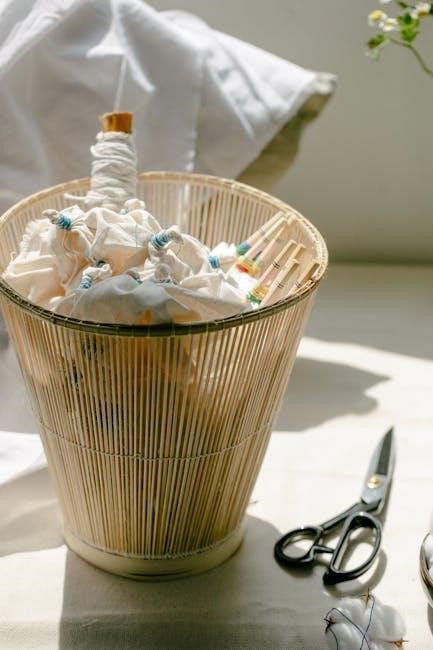
Preparation is key for successful tie-dye. Wash and dry fabric beforehand to remove sizing. Secure fabric with rubber bands or zip ties for desired patterns. Follow dye-mixing instructions carefully.
Washing and Drying Fabric Before Dyeing
Proper fabric preparation ensures optimal dye absorption. Wash fabric in warm water using mild detergent to remove sizing and finishes. Do not use fabric softener, as it can inhibit dye uptake. Gently squeeze out excess water without wringing. Drying the fabric completely before dyeing is crucial. If using a Tulip kit, follow the instructions for dampening the fabric, as some methods require it to be slightly moist for better dye penetration. Skipping this step may result in uneven color distribution. Always check the fabric care label for specific washing instructions to ensure compatibility with the dyeing process.
Choosing the Right Tie-Dye Technique
Selecting the ideal tie-dye technique enhances your project’s visual appeal; Tulip kits offer versatile methods like spiral, shibori, folded, and watercolor effects. Each technique requires specific folding patterns and rubber band placements. For a classic look, the spiral method involves twisting fabric into a coil and securing it tightly. Shibori techniques, such as folding or pleating, create unique geometric patterns. The folded and banded method allows for controlled color application, while the watercolor effect offers a softer, more blended appearance. Choose a technique that aligns with your design vision and skill level. Detailed instructions in the Tulip tie-dye PDF guide provide step-by-step guidance for each method, ensuring success for both beginners and experienced crafters.
Mixing the Dye According to Instructions
Mixing the dye accurately is crucial for achieving vibrant colors. Tulip tie-dye kits simplify this process with pre-loaded dye powder in squeeze bottles. Fill the bottle with water, shake thoroughly, and the dye is ready to use. Ensure the mixture is uniform for consistent results. For optimal intensity, let the dye set for 6-8 hours or overnight. The Tulip One-Step Tie-Dye Kit eliminates the need for additional chemicals, making it user-friendly. For faster results, Tulip’s Two-Minute Tie Dye option reduces setting time without compromising color quality. Always follow the instructions provided in the Tulip tie-dye PDF guide for precise measurements and mixing techniques.
Tie-Dye Techniques
Explore popular methods like spiral, shibori, and folded tie-dye. Secure fabric with rubber bands or zip ties to create unique patterns. Achieve vibrant designs with Tulip’s guidance.
Spiral Tie-Dye Method
The spiral method creates a mesmerizing, swirly design. Start by laying the fabric flat and twisting it into a spiral shape. Secure with rubber bands or zip ties to hold the form. This technique allows the dye to penetrate deeply into the creases, resulting in bold, circular patterns. For best results, apply dye evenly across the fabric, ensuring all areas are covered. Let the dye set according to the instructions, typically 6-8 hours, before rinsing. The spiral method is a classic choice for achieving striking, one-of-a-kind designs with Tulip’s tie-dye kits.
Shibori Tie-Dye Technique
Shibori is a traditional Japanese folding technique that creates unique, intricate patterns. To achieve this, fold the fabric into small pleats or accordion-style layers and secure tightly with rubber bands. The tighter the folds, the more defined the design. Apply dye evenly, ensuring it reaches all folded layers. Let it set for 6-8 hours. Shibori results in geometric or organic patterns, depending on the folding method. This technique is perfect for those seeking a more structured, artistic approach to tie-dye. Tulip kits simplify the process, making it accessible for crafters of all skill levels to produce professional-looking Shibori designs with vibrant colors.
Folded and Banded Methods
Folded and banded methods are foundational tie-dye techniques that create dynamic patterns. Start by folding fabric into desired shapes, such as accordion pleats or twists. Secure with rubber bands to resist dye. Apply dye evenly, ensuring full coverage. Let set for 6-8 hours. These methods allow for a variety of designs, from simple stripes to complex geometrics. Tulip kits provide easy-to-follow instructions, making it simple to achieve professional-looking results. Perfect for beginners, these techniques offer endless creativity, ensuring each project is uniquely personalized with vibrant, long-lasting colors.
Watercolor Effect Tie-Dye
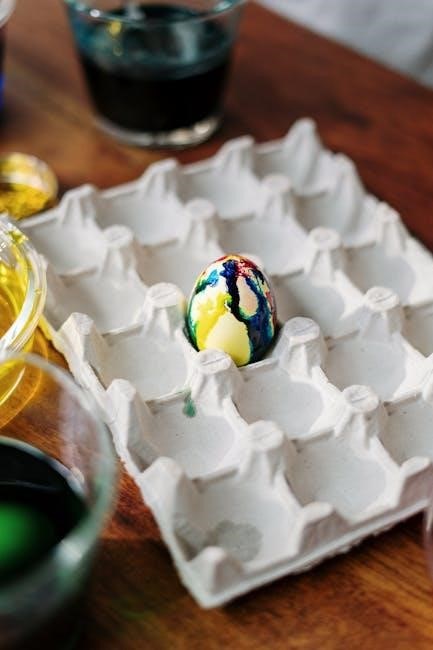
Watercolor tie-dye creates a soft, multi-colored effect with subtle blending. Start by dampening fabric to enhance dye absorption. Fold or twist fabric loosely, securing with rubber bands to resist dye in desired areas. Apply dye in layers, allowing each color to spread naturally without sharp lines. For a layered look, place plastic wrap between fabric folds to contain dye and prevent spreading. Let the dye set for 6-8 hours for vibrant results. This technique mimics watercolor painting, offering a unique, artistic finish. Tulip kits provide pre-mixed dyes and easy instructions, making it simple to achieve this stunning, ethereal design at home.
Applying the Dye
Apply dye evenly using squeeze bottles, ensuring full coverage of folded fabric. Follow kit instructions for vibrant results and easy, professional-looking tie-dye designs at home.
Securing Rubber Bands or Zip Ties
Properly securing rubber bands or zip ties is crucial for achieving desired tie-dye patterns. Start by tightly wrapping bands around folded fabric to create resistance points for dye penetration. For spiral techniques, place bands at intervals along the fabric’s length. In shibori methods, twist and bind fabric sections firmly to prevent dye from reaching certain areas. Ensure bands are snug but not overly tight to allow even dye distribution. Using multiple bands can create intricate, multi-colored designs. Refer to the Tulip tie-dye guide for specific techniques, such as securing bands for watercolor effects or layered folding methods.
Applying Dye to Fabric
Applying dye to fabric is a critical step in achieving vibrant, long-lasting colors. Use the squeeze bottles provided in the Tulip tie-dye kit to apply dye evenly to both sides of the fabric. For layered or folded fabric, place plastic wrap or a trash bag between layers to prevent dye from seeping through. Gently squeeze the dye onto the fabric, ensuring thorough saturation without over-saturating. Allow the dye to set for 6-8 hours or longer for more intense colors. Follow the instructions carefully to avoid uneven application. This method ensures professional-looking results and makes tie-dye projects fun and easy for all skill levels.
Using Plastic Wrap for Layered Fabric
Plastic wrap is a handy tool for managing layered fabric during the tie-dye process. Place a sheet of plastic wrap between fabric layers to prevent dye from seeping through and causing unwanted color transfer. This technique is especially useful when working with folded or banded methods, ensuring each layer absorbs dye independently. Secure the wrap tightly around the fabric to maintain the design integrity. After applying the dye, allow the fabric to set with the plastic wrap in place. This method helps achieve crisp, distinct patterns and enhances the overall vibrancy of the final design. It’s a simple yet effective way to control dye distribution and protect your work surface from stains. By using plastic wrap, you can create intricate, multi-layered tie-dye effects with ease and confidence, making your projects stand out. This technique is particularly recommended for beginners looking to experiment with more complex designs without the risk of color bleeding between layers. Properly sealing the fabric with plastic wrap ensures that the dye stays exactly where you want it, resulting in professional-looking results every time. Whether you’re using the spiral, shibori, or folded methods, plastic wrap adds an extra layer of control to your tie-dye process, making it easier to achieve the desired outcome. For best results, make sure the plastic wrap is smooth and tightly wrapped around the fabric to prevent any movement during the setting process. This step is crucial for maintaining the integrity of your design and ensuring that the colors remain bold and vibrant. With plastic wrap, you can experiment with various layering techniques, knowing that your design will be preserved as intended. This method is also ideal for projects that involve multiple colors, as it helps keep each color contained within its designated area. By following these simple steps, you can unlock a world of creative possibilities and take your tie-dye projects to the next level. The use of plastic wrap not only enhances the quality of your work but also makes the entire process more enjoyable and stress-free. So, the next time you embark on a tie-dye project, don’t forget to incorporate plastic wrap into your technique for truly exceptional results.

Setting the Dye
Let the dye set for 6-8 hours or longer for intense colors. Follow instructions carefully to ensure vibrant results and proper color fixation on the fabric.
Letting the Dye Set
After applying the dye, allow it to set for 6-8 hours or longer for the most vibrant results. This step ensures the dye binds properly to the fabric. Factors like temperature, humidity, and dye quantity can affect intensity. For darker colors, a longer setting time is recommended. Keep the fabric away from direct sunlight during this period. Covering the fabric with plastic wrap can help retain moisture and promote even color distribution. Avoid rushing this step, as it is crucial for achieving bold, long-lasting colors. Refer to the PDF guide for specific timing recommendations based on your project type and desired outcome.
Recommended Waiting Time
For optimal results, allow the dye to set for 6-8 hours or overnight. This duration ensures vibrant colors and proper binding to the fabric. Longer waiting times enhance color intensity, especially for darker shades. Keep the fabric away from direct sunlight and moisture during this period. Covering with plastic wrap helps retain moisture and promotes even dye distribution. If possible, let it set for up to 24 hours for the most intense hues. Always follow the instructions provided in the Tulip tie-dye PDF guide for specific recommendations tailored to your project. Proper waiting time is key to achieving professional-quality tie-dye results.
Factors Affecting Dye Intensity
Several factors influence the intensity of the dye in Tulip tie-dye projects. The quality and quantity of dye used, as well as the waiting time, play significant roles. Using the recommended amount of dye and allowing it to set for 6-8 hours ensures vibrant colors. Fabric type and tightness of folds also impact intensity—looser folds result in lighter shades. Pre-washing fabric removes sizing, allowing dye to bind better. Environmental factors like temperature and humidity can affect absorption. Following the Tulip tie-dye PDF instructions closely helps achieve consistent results. Proper preparation and adherence to guidelines minimize fading and ensure bold, long-lasting colors. Attention to detail is key for optimal intensity.

Washing and Rinsing
After setting, remove rubber bands and rinse gently under cold water to remove excess dye. Wash separately in cold water with mild detergent to preserve vibrant colors.
Removing Rubber Bands
Once the dye has set, carefully remove the rubber bands or zip ties to reveal your unique tie-dye design. Cutting the bands with scissors can help avoid stretching or distorting the fabric. After removing, gently rinse the fabric under cold running water to eliminate excess dye before washing. Proper removal ensures the pattern remains intact and prevents smudging. This step is crucial for maintaining the vibrant colors and distinct folds achieved during the tying process. Always handle the fabric gently to avoid damaging the freshly dyed areas.
Rinsing Excess Dye
After removing the rubber bands, rinse the fabric gently under cold running water to remove excess dye. This step ensures that loose dye particles are washed away, preventing unwanted color bleeding. Rinse thoroughly, especially in areas where the fabric was folded or banded, to achieve crisp, vibrant patterns. Avoid using hot water, as it may cause colors to fade or bleed. Continue rinsing until the water runs clear, indicating most of the excess dye has been removed. Proper rinsing is essential for maintaining the intensity of the colors and ensuring the tie-dye design lasts through future washes.
Washing Instructions
Once the dye is set, turn the garment inside out and wash it in cold water using a mild detergent. Avoid using bleach or fabric softeners, as they can damage the colors. For the first few washes, wash the tie-dye item separately to prevent color bleeding. Gently agitate the water to remove any remaining dye residue. Do not wring or twist the fabric excessively, as this may cause distortion or fading. After washing, reshape the garment while it’s damp to maintain its original form. Following these care steps ensures your tie-dye design remains vibrant and intact for a long time.
Drying and Caring for Tie-Dye
Air dry your tie-dye project to prevent fading. Avoid using hot dryers, as heat can cause colors to bleed. Reshape damp fabric to maintain its form; For long-lasting vibrancy, avoid harsh detergents and opt for cold water when washing. Proper care ensures your design stays bold and intact. Always follow Tulip’s specific care instructions for optimal results and to preserve the beauty of your handmade tie-dye creation. Regular maintenance will keep your unique design looking fresh for years to come.
Drying the Fabric
Air drying is essential for preserving the vibrancy of your tie-dye design. Lay the fabric flat or hang it to dry, avoiding direct sunlight, which can cause fading. Do not use hot dryers, as heat can damage the fibers and weaken the dye bond. If wrinkles form, gently reshape the fabric while it is still damp. For best results, allow the fabric to air dry completely before wearing or storing. Proper drying ensures the colors remain intense and the fabric stays soft. Follow Tulip’s care instructions for optimal results. This step is crucial for maintaining the quality and appearance of your tie-dye creation.
Caring for Tie-Dye Fabrics
To maintain the vibrancy of your tie-dye fabric, wash it inside out in cold water using a mild detergent. Avoid using bleach or harsh chemicals, as they can damage the dye. Gently remove excess dye during the first few washes to prevent color bleeding. Air drying is recommended to preserve the colors and texture. If machine drying, use a low-heat setting. Ironing should be done on the reverse side or avoided altogether to protect the design. For optimal care, wash tie-dye fabrics separately from other clothes, especially in the initial washes. Follow Tulip’s care guide for long-lasting results and to keep your tie-dye creations looking fresh and vibrant.
Washing Separately
Washing your tie-dye fabrics separately is essential to preserve their vibrant colors and prevent dye bleeding. During the first few washes, excess dye may still be present, and washing separately ensures other clothes aren’t affected. Use cold water and a mild detergent to maintain color intensity. Avoid mixing tie-dye items with heavily soiled or dark-colored laundry. After the initial washes, you can gradually introduce tie-dye fabrics into regular loads, but it’s best to continue washing them with similar colors; This care step helps maintain the uniqueness of your tie-dye design and extends its longevity. Always follow Tulip’s guidelines for optimal results.
Why Colors May Fade
Colors may fade due to insufficient dye absorption or improper setting. If the dye isn’t allowed to set long enough, vibrancy diminishes. Overexposure to sunlight or frequent washing can also cause fading. Using too little dye or not following mixing instructions can result in lighter colors. Additionally, washing tie-dye fabrics in hot water or using harsh detergents accelerates color loss. To maintain intensity, ensure dye sets for the recommended time and wash in cold water with mild detergent. Following Tulip’s guidelines helps preserve the colors and ensures your tie-dye project remains vibrant for years to come.
Fixing Uneven Dye Application
Uneven dye application can occur due to insufficient dye coverage or improper rubber band placement. To fix this, gently remove bands, reapply dye to lighter areas, and re-secure bands. Ensure fabric is evenly damp before dyeing, as dry spots resist color. If dye seeps under bands, adjust them tightly. Allowing the dye to set longer can also help intensify color in lighter areas. For minor unevenness, reapplying dye after the initial set period may balance the result. Always follow Tulip’s instructions for optimal results. Consulting the Tulip tie-dye PDF guide can provide additional troubleshooting tips for achieving a professional finish.
Addressing Dye Bleeding
Dye bleeding can occur when colors fade or run during washing, especially if instructions aren’t followed. To minimize bleeding, wash tie-dye fabrics separately in cold water using a mild detergent. Avoid fabric softeners, as they can affect dye adhesion. For Tulip tie-dye, washing inside out helps protect colors. If bleeding occurs, re-wash the fabric immediately to remove excess dye. Ensure all rubber bands are removed before washing to prevent further color migration. For best results, follow Tulip’s care instructions and avoid using harsh detergents or hot water. Regular washing separately will help preserve vibrant colors and prevent dye bleeding over time.
Safety and Precautions
Always wear gloves, work in a well-ventilated area, and avoid skin contact with dye. Keep the workspace clean and follow kit instructions carefully.
Handling Dye Safely
When working with Tulip tie-dye kits, ensure to handle dye responsibly. Always wear gloves to prevent skin irritation and work in a well-ventilated area to avoid inhaling fumes. Keep the dye away from children and pets. Avoid ingesting any dye powders or liquids, as they can be harmful. In case of accidental contact, rinse thoroughly with water. If irritation persists, seek medical attention. Clean spills immediately to prevent staining surfaces. Follow the instructions provided in the Tulip tie-dye PDF guide for safe handling and disposal of dye materials.
Protecting Work Surfaces
To prevent dye stains, cover your work area with plastic wrap, trash bags, or old sheets. This layer will protect surfaces from accidental spills. Ensure the covering is smooth and evenly spread to avoid wrinkles that could disrupt dye application. If using a flat dyeing method, place plastic wrap between fabric layers to stop dye seepage. Additionally, position your project on a sturdy, flat surface to maintain stability. Following these steps will help keep your workspace clean and ensure a professional finish for your tie-dye project. Refer to the Tulip tie-dye PDF guide for additional tips on workspace preparation.
Wearing Protective Gear
Protecting yourself while tie-dyeing is essential. Always wear gloves to prevent dye from staining your skin. Put on old clothing or an apron to avoid splatters on your clothes. If working with powdered dyes, consider wearing a mask to avoid inhaling dust. For extra precaution, use goggles when mixing or applying dye to protect your eyes. Ensure all protective gear is easily accessible before starting your project. These steps will help you stay safe and comfortable throughout the tie-dye process. For more details, refer to the Tulip tie-dye PDF guide, which emphasizes the importance of proper safety measures for a enjoyable and hazard-free experience.
Additional Resources
Access the Tulip Tie-Dye PDF guide for detailed techniques. Watch online video tutorials for visual guidance. Contact customer support for further assistance and troubleshooting.
Tulip Tie-Dye PDF Guide
The Tulip Tie-Dye PDF guide offers a comprehensive resource for mastering various tie-dye techniques. From spiral and shibori to watercolor effects, it provides step-by-step instructions for all skill levels. The guide includes detailed material lists, preparation tips, and troubleshooting advice to ensure vibrant, long-lasting results. Perfect for both beginners and experienced crafters, the PDF is accessible online and covers everything needed to create stunning tie-dye projects. It emphasizes proper dye mixing, folding methods, and setting times for optimal color intensity. With clear visuals and easy-to-follow directions, the Tulip Tie-Dye PDF guide is an essential tool for achieving professional-looking designs at home.
Online Video Tutorials
Tulip offers an array of online video tutorials to guide users through various tie-dye techniques. These tutorials provide visual step-by-step instructions, making it easier to master methods like spiral, shibori, and watercolor effects. Available on platforms like YouTube, they cater to both beginners and experienced crafters. The videos demonstrate proper folding, dye application, and setting processes, ensuring vibrant results. Many kits include a QR code linking directly to these tutorials, enhancing the learning experience. These resources are particularly helpful for visual learners, offering a clear and engaging way to achieve professional-looking tie-dye projects with ease and confidence.
Customer Support Contact
For any questions or assistance with Tulip tie-dye projects, customers can reach out to the dedicated support team. The official website provides a contact form and email address, infotulipcolor.com, for inquiries. Representatives are available to help with troubleshooting, product guidance, or general advice. Additionally, the Tulip Color Crafts website offers a wealth of resources, including FAQs and downloadable guides. Many tie-dye kits also include QR codes linking to video tutorials and PDF instructions. Whether you’re a beginner or an experienced crafter, Tulip’s customer support ensures a smooth and enjoyable tie-dye experience. Feel free to connect for any help or clarification needed.